Section summary
- Buy an inexpensive VPS from your favorite provider.
- Get the install command under "Nodes" and execute on the VPS.
- Wait a moment for the VPS to appear in the list of nodes.
- Go to your registrar and set the node IP to all domains.
- Go to "Add domains" and add your domains there.
Creating a node
Node is a server that is responsible for processing your traffic. The number of nodes is not limited, you need at least one to work. You buy and connect them yourself, we do not provide ready-made ones.
Ordering a server
Buy a victim VPS from any provider, but we recommend these. Any VPS on any virtualization is suitable for work.
Recommended OS: Rocky 8-9, CentOS 8-9, Debian 10-11
Recommended system requirements depend on traffic volumes:
- Up to 10,000 clicks per day (solo work) - any option will do, about $5 per month.
- 10000-50000 clicks per day (small team) - server with 2-4 GB RAM, about $10-20 per month.
- 50000-500000 clicks per day (serious work) - we don't recommend parsimony, use server with 4-8 GB RAM and 4 cores, $20-40 per month.
- 500000+ clicks per day (affiliate networks) - multiple servers recommended.
You can contact our support team for server recommendations. With large volumes, you can increase the number of servers and distribute traffic across them.
Connecting a node
After ordering, wait for the server to activate. It usually takes no more than half an hour. After activation, you will receive an email with the server IP address, login and password to access it. Connect to the server via SSH using these IP, login and password and return to the control panel in the "Nodes" section.
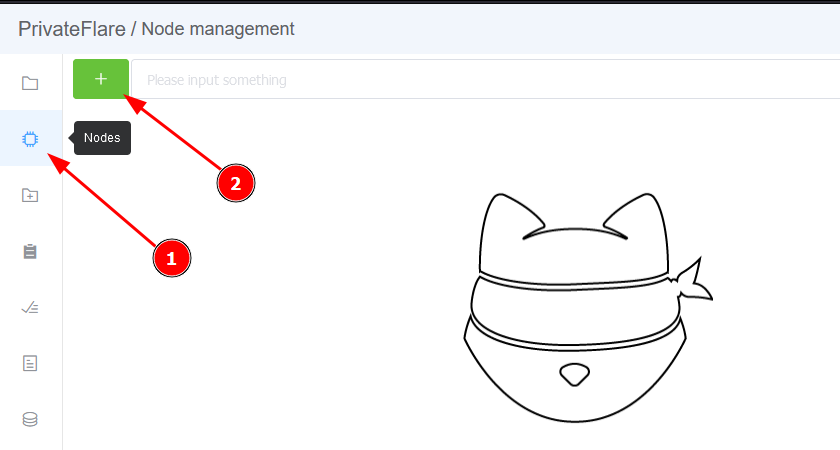
Going to the section "Nodes", click on the big green button with a plus sign. The node connection window will open. Here you can set the name of the new node (New node name), it can be changed later. Copy the line from the field (2) and return to the connection to the VPS.
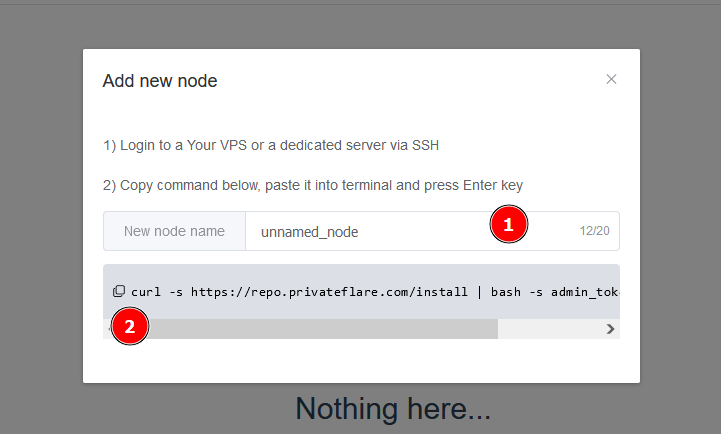
Paste the copied line into the terminal, press Enter and wait 20 seconds. Warnings may appear during installation - this is normal. When the installation is complete, the message "Done!" will appear. and in a minute the node will appear in the interface.
Preparing domains
Domains are configured in your registrar's panel. It could be NameCheap, RegRu or something like that. If you don't know where your domains are registered, it's better to start new ones.
- Configure domain DNS server. This action is performed in the personal account of your domain registrar. In the DNS settings of the domain, specify the use of free DNS of your registrar. If your registrar does not provide free DNS, we recommend using CloudFlare, the settings are shown below.
- Configure your domain's DNS zone. This action is also performed on the side of your registrar or CloudFlare. Go to the DNS zone editor in the registrar's personal account (do not confuse it with setting up DNS servers, you just need to set up a DNS zone).
- Remove any existing A, AAAA, and CNAME records that point to the domain you want. For the root domain, their name will be @ or the domain name, for a subdomain, respectively, the name of the subdomain.
- Add a new record of type A with this name and address of any of your nodes.
- Do not add these entries for the www subdomain as its use is not supported.
- Wait for the end of the domain binding. Depending on various conditions, including the phase of the moon and the strength of the torsion fields, domain binding can take from several minutes to three days. You can check if the domain is linked by clicking the "Check" button.
Important! All your domains will be accessible from any node. You can specify any of the IP addresses of active nodes in the domain settings and it will work. You can change the IP to another at any time and it will work again. You can keep as many spare nodes in case of blocking and urgent change of addresses.
Adding domains
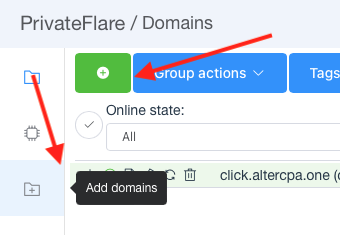
You have prepared the nodes and configured the domains themselves at the registrar. Now they can be added to the PrivateFlare control panel. Go to the "Add domains" section from the navigation bar or the big green button in the "Domains" section.
A form for bulk adding domains will open. In it you need to specify your target domain, its IP and the list of domains that we bind to it.

Specify the following settings:
- Set default backend IP. The IP address of your target server where we direct domains. There might be a web server, AlterCPA, Binom, Keitaro, etc.
- Tags. List of tags for domains separated by commas. It is convenient to separate domains according to their purpose, team member, buyer or other attribute. Filtering by these tags is available in the list of domains.
- Make free SSL certificates. SSL certificates will be generated automatically. They are not always needed and not for everyone, we can simply hang domains on a proxy without certificates. But more often they are still needed.
- Force redirect to HTTPS. Whether or not to activate automatic redirect to the protected version of the site. Relevant for all ad networks. It is enabled by default and suits 99% of users.
- Mask as. The target domain to which other domains bind. More on masking later.
- Domains list. List of domains to park, one per line.
- Add. Button to start the process of adding domains.
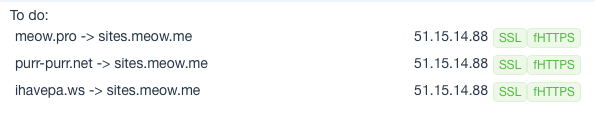
As you fill in, on the right instead of a cat you will see a list of domains and what to do with them.
Click "Add" and your domains are ready to go.
Domain masking
This function is designed to change the domain on the fly. Can be used in cases where you need to hide the use of multiple domains. Or just collapse a large number of domains to one.
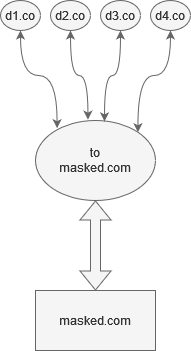
It looks like this: we pour on 100 domains in some network. And on the server we have some software that can work with only one domain. For example, due to licensing restrictions. In this case, we have two options: redirect from these 100 domains to one and process traffic there, or replace the domain on the fly.
- Requests for the domains
d1.co-d4.cocome to our node. - Within the request, the domain is replaced with
masked.com. - The modified request is forwarded further - to our backend, supposedly by the domain
masked.com. - The backend processes the request for the domain
masked.com. - The response is returned back to the node.
- The spoofed domain
masked.comis again replaced with the originald1.co-d4.co. - The response is returned to the client.
Thus, the backend processed the request without knowing anything about the original domain to which this request came. And the client received a response, not knowing that his request was processed somehow non-standard.
Domain settings
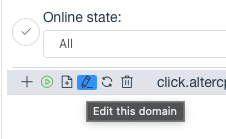
You can specify additional domain settings after adding them. Go to the list of domains, click on the pencil next to the desired domain.
The domain editing form will open:
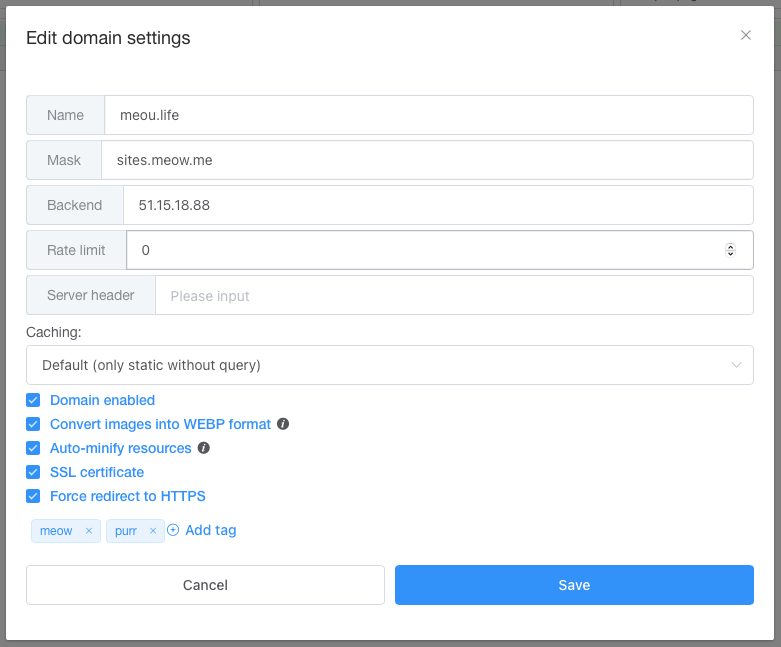
Available domain settings:
- Name is the domain we are working with. Specified without www at the beginning.
- Mask is the domain we are sending traffic to. It may or may not be the same as the domain name - we will change all links on the fly.
- Backend - IP address of the server where the target domain is located and where all requests are sent.
- Rate limit - limit on the number of requests per second from one address. Helps protect against some attacks.
- Server header - the header with which the server is presented to the client. Usually contains
nginx. You can specify any data to disguise your server and make attacks more difficult. - Caching - caching settings: disabled, standard caching of only statics and full caching of all GET requests.
- Domain enabled - checkbox for domain activity. Remove it if you want to stop traffic through the domain.
- Convert images to WEBP - all large images in your sites will be converted to lightweight WebP format on the fly and inserted into the code. Occasionally spoils transparent images.
- Auto-minify resources - large JS, CSS and HTML files will be compressed and cleaned up for maximum performance.
- SSL certificate - enables HTTPS support on the site, it is recommended to always use it.
- Force redirect to HTTPS - automatically redirects to an HTTPS connection. Do not use if your PrivateFlare server is behind another proxy.
- Tags - a list of tags for easy domain search.
CloudFlare as a DNS provider
CloudFlare provides the perfect DNS servers for your domains. You can use them instead of your ISP's DNS. Set up your domain like this:
- Sign up for CloudFlare. Don't buy a paid or premium subscription, you won't need it.
- Add your domain to CloudFlare. To do this, use the "Add a Site" button on the main page of your CloudFlare personal account. When adding, select a free plan. You don't need a paid subscription.
- Enter DNS CloudFlare for your domain. When adding a site, CloudFlare will prompt you to change your domain's DNS servers to yours. This is done in the personal account of your domain registrar.
- Configure your domain's DNS zone. This action is also performed on the CloudFlare side. Go to the DNS zone editor in your personal account.
- Remove any existing A, AAAA, and CNAME records that point to the domain you want. For the root domain, their name will be @ or the domain name, for a subdomain, respectively, the name of the subdomain.
- Add a new record of type A with this name and address of any of your nodes.
- Do not add these entries for the www subdomain as its use is not supported.
- Check the record type. In the CloudFlare DNS records section, the "DNS Only" mode should be enabled instead of "Proxied".